Showing posts with label recipe. Show all posts

Friday, 15 July 2016

I'm back, seedjack.

I've been going through a bit of a creative dry spell lately, with very little time spent making, drawing or crafting outside of work. I'm not sure why, but I think I need to rediscover some creative energy.

The only area where I am finding motivation, and enjoying making things, is in the kitchen. I've been setting time aside most weekends to do a spot of baking and Ben and I have been trying new recipes non-stop during the week. It's been a good time for our tummies!

I thought I'd share a little recipe for something I made at the weekend, as it was a successful baking experiment, inspired by a tasty seedy snack one of my work pals shared with me last week.


Savoury seedjack
(Makes approximately 12)


Ingredients
150g rolled oats
50g mixed seeds (plus extra for sprinkling)
100g grated cheddar cheese
50g mozzarella cheese
1tbsp melted butter
3 eggs
Small bunch of fresh chives (or other herbs)
Salt & pepper


Method
Preheat the oven to 190ÂșC and line a 20 x 20cm baking tin with parchment.

Mix the oats, seeds, cheddar, mozzarella, butter, eggs and herbs in a bowl and season with salt and pepper.

Put the mix in your lined tin and ensure it is evenly distributed right to the corners. At this stage I sprinkled the top of my mixture with a small handful of linseeds. 

Put in the oven and bake for 25-30 mins, until golden brown on top.

Transfer to a rack to cool, and then slice into flapjack pieces.

So easy! Now enjoy...


They're perfect for a mid-morning work snack. Lovely and cheesy. I think I'm going to make another batch this weekend, with extra seeds.

Let me know if you try this recipe out as I'd love to hear how you get on!


Wednesday, 30 March 2016

let's cook: ravioli


Three cooking challenges in three months - we're doing really well this year! This one was a tough one too. We set ourselves the challenge of filled pasta, which actually involves a lot more thought than I first imagined.

First we had to decide on the form of pasta and the dough recipe, then we had to think of the filling, and finally decide on a sauce/accompaniment to serve with. A lot of elements to consider.

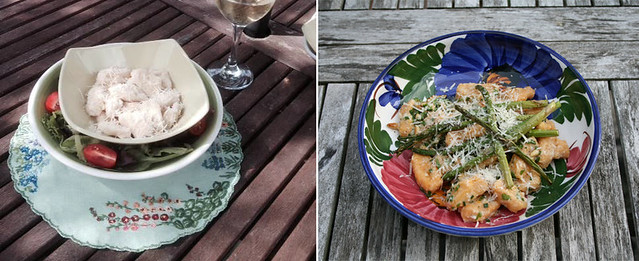
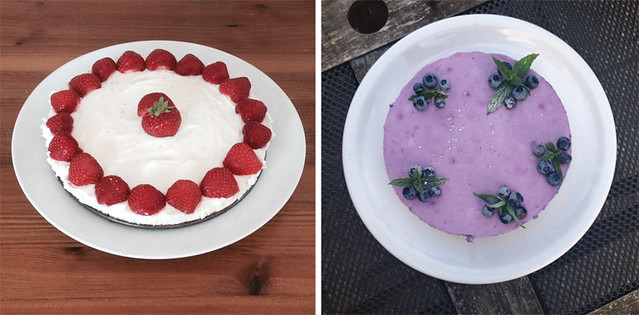
We both went for ravioli as you can see - mine is pictured on the left above, and my mum's is on the right.

I've broken the process down into stages below with some recipes too if you'd like to try it yourself.


STAGE ONE: THE PASTA

I had never made pasta before (nor had my mum) so this was an exciting one for me. I always had visions of it being really difficult, making a lot of mess and needing a lot of space, but thankfully none of the above turned out to be true!


I didn't want to stick with just plain egg pasta dough so I decided to make two different batches of pasta - one with parsley & one coloured with beetroot - both of which filled me with more pleasure than balls of dough should.

For the parsley pasta I used the "advanced" mixing method of forming the dough directly on work surface by cracking the eggs into a well made in the flour. I felt like a pro! I wasn't quite as adventurous with the beetroot one (mostly because I didn't want to stain the whole kitchen pink) so opted for the food processor approach with that one.

Isn't the colour great? Like pink bubblegum!


The recipes I used were as follows...


Ingredients 

Each of these makes about 450g of pasta.

Parsley pasta 
2 eggs
1⅓ cups 00 pasta flour
2 tablespoons chopped fresh parsley
2 tablespoons olive oil

Beetroot pasta
2 eggs
1½ cups 00 pasta flour
1 small roasted red beetroot (pureed)
1 tablespoon olive oil


Method (the professional way!)

Place your flour on the work surface and make a well in the centre.

Crack the eggs into the well and add the oil and extras, e.g the herbs.

Using a fork, beat the mixture in the centre, slowly incorporating the flour. If you're like me, you'll find you might get a bit eager with the fork and break through your flour walls so be on the lookout for egg overflow. As more and more of the flour begins to combine with the egg you'll probably want to abandon the fork in favour of using your hands.

Once the mixture is combined into a solid ball knead the dough for about 10 minutes until it becomes stronger and more elastic. When your dough looks smooth and no longer feels sticky, shape it into a ball and cover with a tea towel/clingfilm to keep it moist.

Then let the dough rest for at least 30 minutes.

When you are ready to use your dough, cut it into quarters so you can work on one piece at a time, while keeping the other pieces covered to prevent them drying out.


I actually invested in a pasta machine for this project as I had some vouchers I'd been given for my birthday. Beforehand I thought I'd just make my pasta by hand, but decided to treat myself, and I'm very pleased I did!

Because I made two lots of dough I had enough to make some extras on top of my ravioli so I used my pasta maker to roll out the dough and then cut it into tagliatelle & fettuccine. It worked really well, and was a nice added extra for this challenge! I have frozen some of the fresh pasta to eat at a later date too.


STAGE TWO: FILLING & CONSTRUCTION

Back to the ravioli. The filling I decided to used was taken from this Food 52 recipe and was a combination of parsley, mint, ricotta and goat cheese.

It was just a case of combining all the ingredients in a bowl and then dolloping on the rolled out pasta. I found this whole process very relaxing; rolling out the dough, passing it through the pasta machine until it was thin, and then constructing the ravioli.


I bought myself a round ravioli cutter (I also got a square one for my mum!) so was able to create some nice uniform shapes. They looked really nice I think, and held together well.


STAGE THREE: SERVING SUGGESTIONS

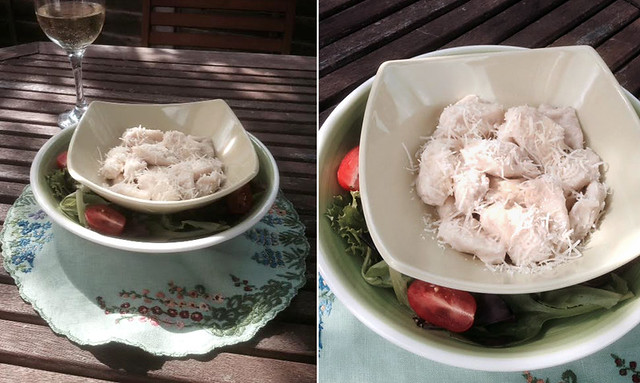
I made my ravioli in the day time while Ben was at work, but couldn't wait to the evening to try them so made myself a small portion of super fresh ones, which I served on a bed of fettuccine with a homemade avocado pesto and load of parmesan. Delicious! And so quick to cook!

It was the first day of the year that it was warm enough for me to eat my lunch in the garden too so that was an added treat.


I think the ravioli was best cooked fresh as I wasn't quite sure how to store them once constructed and put them in the fridge, but after a while I think the filling began to seep into the pasta a bit and they got a little sticky. Perhaps I rolled the pasta thinner than I was meant to?

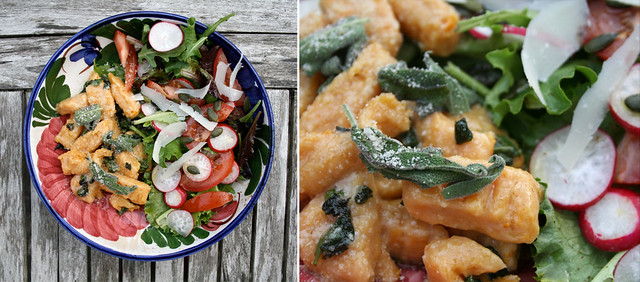
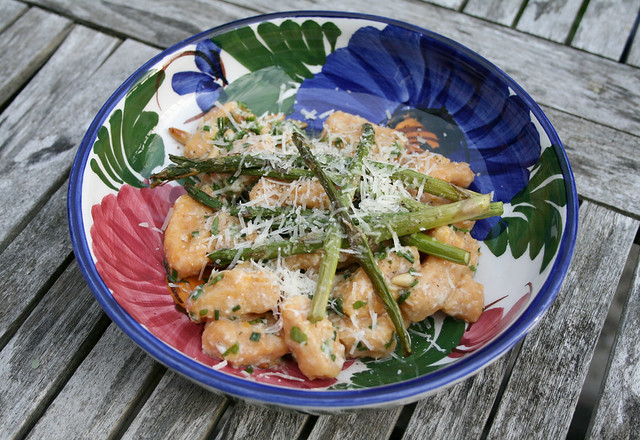
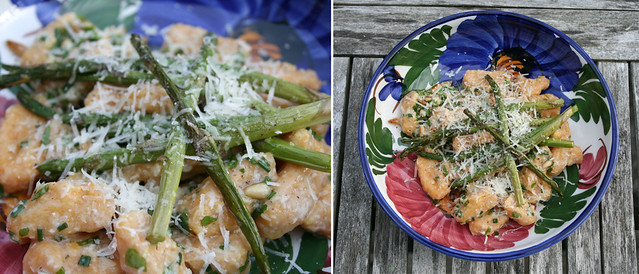
Anyway, there were still some good (non-sticky) ones left for Ben to try when he got home from work. This batch was a mixture of herb and beetroot ones, and I served them on parsley tagliatelle with sauteed asparagus and walnuts in a lemony buttery sauce, using this recipe from Green Valley Kitchen.

It was a nice feast!


My mum made her batch on Easter Monday and she said that she found it pretty challenging one too - apparently there was flour everywhere!

She opted for an egg pasta dough, but tried two different fillings. One which was spinach based, and the other a ricotta one. With no pasta maker available she rolled out her pasta by hand and thinks she may have left it a little thick as she found the ravioli took a while to cook. Look how neat they are though. Like little pillows.


She served it with a pomodoro sauce, although confessed that it came out looking a bit like chutney, which is a little odd. Good to see a healthy helping of parmesan too though.

Now, on to the scoring...

Ben gave me a very respectable 9/10 with one point being deducted by the disappointment of me having to throw some of the super sticky ravioli pieces into the bin. I definitely think I'll be making pasta again though so I'll try and make it when he's not at work next time so we can both enjoy it super fresh!

My dad gave my mum another high score with 8/10, possibly with a couple of marks being deducted due to the thickness of the pasta. I did have the advantage of having a pasta machine so I would bump that up to a 9 too I think.

Another pretty good round! This challenge is really improving our skills.


My mum has requested an easier challenge next time (not involving dough) so we have opted for swiss rolls or roulades. I've already started pinning some recipe inspiration.

The thought of them is making my mouth water already.

Sunday, 10 January 2016

let's cook: stuffed bread


Our cooking challenge is off to a strong start this year - with both of us making our stuffed breads in the first week of January. Last year we had four different cook-offs: dips, tart tatin, gnocchi and jam & scones. Let's see if we can better that this year!

I think this one was a good challenge - neither of us have done much bread-making before so it was a bit of a skill test - but also a creative one in terms of deciding on a filling and shaping the bread.

I made a couple of Mediterranean style pesto and sundried tomato mini plaited loaves, and my mum went made a giant plaited bread ring with a Moroccan filling: olives, goats cheese and a spicy onion mixture. Sounds tasty to me.


I used this great recipe from Mediterranealicious as a basis for my bread but made my own pesto for the filling and added some sundried tomatoes. The pesto was super quick. Here's the recipe if you want to try it out.

- - - - - - - - - - - - - - - - - - - - - - - - - - - - - - - - - - - - - - -

Super speedy basil pesto

Ingredients

2 packed cups of fresh basil leaves
½ cup extra virgin olive oil
½ cup grated parmesan
¼ cup pine nuts
2 crushed garlic cloves

Instructions

Put all the ingredients in a food processor and mix.

Season with salt and pepper to taste.


The recipe above makes enough pesto for the bread, with some left over to use another day (we had it with linguine the following day and it was delicious!)

When it came to making the bread I ran into a bit of difficulty as the dried yeast I had in the cupboard had expired I think - I tried twice and it just would not activate, and my first two batches of dough refused to rise.

I went out and bought some instant yeast sachets though and that did the trick. I left the dough for an hour in a warm place and it rose enough that I was sure the yeast was doing it's job. From the sound of it, my mum's yeast was super active as she said her dough kept growing and growing!

Once the dough and the pesto were ready I rolled out the bread mixture into an A3 sized piece, covered with the pesto and some chopped sundried tomatoes, then rolled it lengthways to create a long tube. I strayed from the recipe instructions here and chopped my rolled up dough in half to make two smaller loaves.

The fun bit was cutting the rolled dough in half lengthways to reveal the filling, then twisting the two halves around each other to make the plait.


I thought it might untwist itself as it baked in the oven, but luckily it came out looking the same shape as when it went in. I really like the outcome here - the shape is really nice and the fact that there is so much filling on display makes it look pretty tempting.


My mum said she got on quite well with her recipe too - which was from a Bake Off book. I think she was a bit suprised by how big it turned out, but it looks like a successful bit of baking, and the flavours sound great!

So....to the scores:

We both ended up eating the bread warm from the oven with some baked Camembert (great minds!) Judging by the picture my mum and brother enjoyed theirs over a game of Scrabble.


It's lucky my mum had my brother there as a judge as my dad had two bites and decided he didn't like the flavours (typical!) My mum scored a generous 9/10 from Tim though, with the score being bumped up to 10 because it was served with cheese.

Ben also gave me a very generous mark of 10. I'm wondering now if this is possibly partially due to the cheese too? Either way it was a great result all round - full marks for us both!

Maybe one of the most successful cooking challenges to date?


Next time we'll be making Bakewell tarts.
I think I might do an iced one. Yummy.

Sunday, 28 June 2015

let's cook: gnocchi

lets make gnocchi

This time the cooking challenge is dedicated to gnocchi. A bit of a technical one.

My mum made Gnocchi di Romagna (pictured left) which are ricotta and flour-based gnocchi, and I made a sweet potato version (pictured right).

I found this one quite tricky - partly because I wasn't exactly sure on the consistency I was aiming for with the gnocchi. It's not something I've eaten much of, and when I have eaten some it has rarely been homemade.

I chose this recipe from the Just a taste website as I liked the simplicity of the ingredients, but with the slight twist on traditional gnocchi.

sweet potato gnocchi mixture

It took quite a while to make but a lot of that time is spent draining the ricotta, and baking and cooling the potatoes so it's not all full-on cooking time.

I found that I needed much more flour than the recipe said to make the mixture into a manageable dough - perhaps because I didn't drain the ricotta enough - but once it got to a more solid (although very sticky) state I was able to form them into wonky gnocchi shapes.

gnocchi shapes

The recipe made enough for 4 people so I froze half the batch at this stage.

A tip: make sure there is enough space in your freezer before you do this, as we had to chip a couple off the top of the freezer drawer a couple of days later (told you they were sticky).

The first batch I cooked on the day of making, and followed the recipe for Kelly's brown butter and sage sauce.

Ben really like this when he tried it, although I have to say, I wasn't that keen on it myself. A bit sage heavy for me. The gnocchi really does soak up the buttery sauce though, which is nice.

gnocchi with sage & brown butter

I was quite pleased I'd made enough for two batches as it meant I could try something different for round two. This time I made some pesto with some herbs from the garden, and served it with some roasted asparagus and parmesan.

gnocchi pesto asparagus

I really liked how this turned out, although I was a bit overzealous with the lemon juice (the gnocchi really did absorb it). I cooked the gnocchi for a little longer the second time too and I think they had a better texture when slightly firmer.

Here's the recipe for the pesto I made if you want to follow it - I've reduced the amount of lemon so you should be safe.

- - - - - - - - - - - - - - - - - - - - - - - - - - - - - - - - - - - - - - -

Lemon, chive and parsley pesto
(Makes enough for two)

Ingredients

1 clove of garlic, finely chopped
A small bunch of parsley, finely chopped
A small bunch of chives, snipped
2 tbsp toasted pine nuts
2 tbsp grated parmesan, plus extra for serving
Zest and juice of ½ a lemon
3 tbsp olive oil

Instructions

Put the garlic, parsley, chives, pine nuts, cheese and lemon zest in a small bowl and mix.

Season well, then stir in the olive oil and lemon juice.

That's it - super easy! Would be great served with gnocchi, pasta, or on a potato salad.

- - - - - - - - - - - - - - - - - - - - - - - - - - - - - - - - - - - - - - -

Back to the gnocchi, my mum made her batch yesterday. She followed a recipe from a 1979 Italian cookbook, which didn't include potato. Controversial? Maybe.

She sent me a message halfway through saying that she'd made a sloppy mess and the kitchen was covered in flour, but I think she must have been exaggerating as the finished gnocchi look quite firm in her pictures.

She served them with a simple butter and parmesan dressing.

mum's gnocchi

Now, to the results...

My dad gave my mum a mixed review: he said the taste was ok, but that they were a bit slimy. He gave them 8/10 though so he must have liked them! Good score.

Ben gave me 7.5, which I was happy with as I didn't really enjoy my first dish that much.

Pretty good results all round I'd say, particularly as this was one neither of us were that optimistic about.

gnocchi with roasted asparagus and homemade pesto

Next time we'll be making jam and scones.
Perfect for a summer cream tea!

Saturday, 27 June 2015

snack thyme

cheese & thyme biscuits

I decided to make some savoury biscuits today, to accompany some post-dinner cheese this evening.

These cheese and thyme mini biscuits were super quick to make with very few ingredients, and the dough can be made in advance and frozen so it would be easy to serve them fresh from the oven when you have guests.

I've written out the recipe I used below if anyone fancies making some. (I will certainly be making them again).

- - - - - - - - - - - - - - - - - - - - - - - - - - - - - - - - - - - - - - -


Cheese and thyme mini biscuits
Make approx. 40 (depending on size)

Ingredients

4 tbsp soft butter
¾ cup grated mature chedder
¼ cup grated parmesan
¾ cup plain flour
2 tsp chopped fresh thyme (or half the amount for dried thyme)
1 tsp English mustard powder
Pinch of salt

Instructions

Mix the two types of cheese and butter together in a bowl.

Add the flour, thyme, mustard powder and salt and combine to form a dough.

Roll the dough into a thin log, roughly 2-3cm in diameter. At this point I split the dough in half, so I could freeze some for later.

Wrap the log in cling film and leave to chill in the fridge for around half an hour.

Preheat the oven to 180ÂșC and line a baking tray with baking parchment (you may need two if you are doing the whole mixture in one batch).

Slice the dough into 5mm thick pieces, place on the baking tray and bake for about 10 minutes, until golden. Transfer to a wire rack to cool - they taste good warm so make sure you try one while they're fresh from the oven!

- - - - - - - - - - - - - - - - - - - - - - - - - - - - - - - - - - - - - - -

I think this recipe would also be great with rosemary instead of thyme, or if the mustard powder was substituted for cayenne pepper. Oh, and I might add some poppy seeds next time.


biscuit dough
pre-baking biscuit thyme

They're really tasty. I'm finding it hard to resist eating them all ahead of dinner.

Monday, 10 November 2014

sloe sundays

sloe sundays

At the end of September we spent an afternoon up on the downs foraging for berries. We came back with a small tub full of blackberries for a Sunday evening apple crumble and an even bigger haul of sloes which I put in the freezer and forgot about for a while.

sloe picking

A few weeks later Ben and I made a batch of sloe gin (more about that another time) which used up about two thirds of the berries we had. I thought it would be a waste to throw the rest away so I put them back in the freezer with the vague idea that I'd make another batch of gin when I'd picked up another bottle.

However, this weekend I went around to Hannah's house for a delicious lunch party and was inspired by the sloe syrup that she had made and served with ice cream for pudding. It was delicious! As was her elderflower gin which I was very lucky to sample.

I decided to follow Hannah's lead and make some syrup to use up the rest of the sloes. It's super easy to make and I've written out the recipe below in case any of you want to try.


sloe syrup Ingredients

Equal parts sloes, sugar and water.
I used:

600g sloe berries
600g granulated sugar
600ml water
+
Juice of half a lemon
sloe syrup ingredients
Instructions

Put the sugar, sloes and water into a large saucepan and simmer for 40 minutes, stirring often.
The mixture will turn a lovely deep purple colour.

I added the lemon juice to the mixture halfway through simmering.

Next strain the mixture through a colander to remove the bulk of the sloe berries, then strain through fine muslin to remove any smaller bits. I ended up with about 600ml of syrup after straining.

Pour the mixture into sterilised bottles or containers, and seal. Once opened keep the syrup in the fridge.

I decided to freeze half of my mixture to keep for later.

sloe syrup making

Uses

The syrup is delicious as an accompaniment for ice cream. I suspect it would also make a nice pancake topping and could be used to make some great gin cocktails too.

Apparently it is also rich in vitamin C and has been recommended to treat colds.

Medicinal and tasty too. Enjoy!

Monday, 14 July 2014

let's cook: cheesecakes

let's cook cheesecake

This instalment of our cooking challenge is dedicated to cheesecakes.

You can see our results above. My mum made the strawberry cheesecake on the left, and I made the blueberry one on the right. What a feast for the eyes they both turned out to be!

I enjoyed this challenge a lot. Browsing for recipes was a real pleasure, and when I stumbled across this purple delight shared by Kelly of sass & veracity I was sold.

I found the recipe a tad fiddly, as it was from a Scandinavian book and a lot of the ingredients were measured in volume rather than weight - it's tricky to know how much a litre of blueberries is!  I was also feeding a couple of vegetarians so had to substitute the gelatine for a vegetarian alternative.

That meant I ended up changing some of the measurements so it was all a bit of a gamble, but it paid off I think! The cheesecake had a very light mousse-like consistency (possibly down to the gelatine), and I think it would make a great dessert for any summer dinnertime.

The reviews were pretty positive too, with the only downside being that the biscuit base was a bit on the soft side (I think this could be rectified by chilling the mixture a bit more before constructing the cake).

My mum wasn't entirely satisfied with her one. The base was a bit on the solid side, and ended up extremely hard to slice through. She reckons it looked better than it tasted, and unfortunately my dad (head judge) agreed.

So the scores are in:

I got awarded 9/10 with one point deducted for a soggy base.
My mum got a 6/10 from my dad - not a bad score!

I'd say that was a pretty successful one all round!

blueberries

If you fancy making a purple cheesecake of your own, here's my adaptation of the recipe:

- - - - - - - - - - - - - - - - - - - - - - - - - - - - - - - - - - - - - - -

Blueberry cheesecake
(using a 23cm cake tin)

Ingredients

For the base:
200g digestive biscuits
80g melted butter (unsalted)

For the filling:
470g blueberries
100ml water
1 sachet vegetarian gelatine
500g cream cheese
300ml whipping cream
160g fine golden caster sugar
1½ tablespoons vanilla sugar
1 tablespoon lemon juice

To decorate:
Icing sugar
Fresh mint

Instructions

Crush the biscuits into crumbs and mix with the melted butter. Press into the bottom of a parchment-lined cake tin. The layer should be about 5mm thick.

Pour the water and most of the blueberries (save some to decorate the top!) into a saucepan. Squish the blueberries with a pestle or rolling pin and boil for a few minutes. The colour should now be a lovely deep purple.

Strain through a sieve to give a clear juice, and then pour the juice back into the pan.

Soak the vegetarian gelatine flakes in a little cold water to dissolve them a bit, then add to the blueberry juice and heat at a low temperature. Once it's all mixed in with the juice allow it to cool. Add the caster sugar to this mixture while it's still a little warm so that the sugar also dissolves.

Whip the cream, then mix with the cream cheese, vanilla sugar, lemon juice and finally the blueberry mixture.

Stir until the mixture becomes a nice even purple colour.  I would then pop it in the fridge for a little bit (approx. half an hour) to cool the mixture down before adding to the biscuit base - hopefully this will avoid a soggy bottom.

Cover the base with the mixture and smooth over the surface with a spatula.

Keep refrigerated overnight (or for a minimum of 4 hours).

When you are ready, remove from the tin, decorate with the remaining blueberries, fresh mint and icing sugar. Then serve.

blueberry cheesecake

Yummy!

Next time the challenge is to make two different dips and some dipping sticks. Summer snacks.

Monday, 31 March 2014

let's cook: shortcrust pastry pies

let's cook: pies

This round of our cooks challenge is dedicated to shortcrust pastry pies.

Sweet or savoury, the only requirements were that the pastry had to be made from scratch and that we had to make an effort to decorate the pies.

My mum made an apple pie decorated with cute cat shapes, and I went for a Stargazy pie, decorated with fish heads and tails (and some stars!). Not very pretty, but traditional.

If you're not familiar with a Stargazy pie, here's a nice illustrated story and simple recipe I found a while ago.

My mum and dad were both in charge of judging this time round as they got to sample both pies.

The results: My mum scored 7/10, with points deducted for a soggy bottom, and I got 9/10. Not at all bad!

stargazy pie

I couldn't find one complete recipe for the pie that I wanted to work with, so I ended up combining a few different suggestions. Here are the details if you want to try it out:

- - - - - - - - - - - - - - - - - - - - - - - - - - - - - - - - - - - - - - -

Stargazy pie
(enough to feed 3 hungry mouths)

Ingredients

For the shortcrust pastry:
250g plain flour
A pinch of salt
110g butter (cubed)
60-90ml cold water
+ 1 egg for glazing

For the filling:
4 pilchards, sardines or small herrings (I used herrings!) - Ask the fishmonger to gut and bone the fish, but make sure you keep the heads and tails!
2 rashers streaky bacon
½ an onion
2 hardboiled eggs
1½ tbsp fresh parsley
½ tbsp flour
175ml fish stock
150ml double cream
1 ½ tbsp white wine

stargazy ingredients

Instructions

Make the pastry
Preheat the oven to 190ÂșC.
Put the flour and salt in a bowl.
Add the butter and rub with your fingertips until it has a breadcrumb texture.
Add the water slowly, until the mixture binds together.
Wrap and chill for 15 minutes.

Once the pasty has cooled, roll out half of it to line the bottom and sides of your pie dish.
Add baking beads and blind bake for 20 minutes.


Make the sauce
Heat the butter in medium saucepan.
Cook the onions and bacon on a medium heat until soft.
While stirring add ½ tbsp flour, the wine and fish stock.
Bring to the boil, and then simmer for 10 minutes.
Add the cream, bring back to the boil, and simmer until the mixture is reduced by half.
Remove from the heat, add in the parsley and chopped egg, season and leave to cool.


Assembly
I layered some of the fish fillets on the bottom of my blind-baked pastry case.
Then I added half the sauce, some more fish, and a final layer of sauce.

Roll out the rest of your pastry to cover the top of the pie.
Position some of the fish heads on top of the pie pointing upwards.
Carefully lay the pastry over the top, the make small slits to allow the herring heads to show their faces.
I made extra slits and slotted the tails in after the pastry was in place.

Use a pastry brush to apply egg around the rim in order to join the lid of the pastry to the base, pressing down lightly as you go.
Glaze the top of the pie with egg, along with any pastry decorations you have chosen to add (I suggest some stars, and the moon!)


Baking
Put the finished pie in the oven for half an hour at 200ÂșC, or until the top is a nice golden brown colour.
Serve with nice fresh vegetables.

- - - - - - - - - - - - - - - - - - - - - - - - - - - - - - - - - - - - - - -

Yum!

Next time we will be making cheesecakes. I'm looking forward to this one.
heads and tails

Monday, 3 February 2014

let's cook: soufflés

gooey

The cooking challenge is back!

This time we chose to make soufflés. The flavour was optional so we've ended up in a sweet vs. savoury situation, which is quite nice.

My mum went for a GIANT cheese soufflé:

Mum's cheese souffle

While I made mini chocolate soufflé pots:

chocolate souffle
[Note: The zoom on these photos may be misleading]

I made mine to accompany a delicious meal made by Mark. They went down a storm - they rose well and were nice and gooey. We have since had them again at home (courtesy of Mark) so that's a positive seal of approval.

My dad gave my mum 5 out of 5. Top marks! Although he said he wouldn't want to eat it again. I'm not sure if that makes sense, but it did look quite a substantial feast.

A good result all round. And in the process I discovered that making a soufflé is far less complex than I first thought. I thought it was all egg whites and whisking, but my recipe involved none of that kerfuffle (maybe I cheated?).

Here's the recipe though, so you can judge for yourselves:

- - - - - - - - - - - - - - - - - - - - - - - - - - - - - - - - - - - - - - -

Mini chocolate soufflés
(enough to fill 8 ramekins)


Ingredients
200g dark chocolate
150 butter (plus a little extra for the ramekins)
6 eggs
175g sugar
125g plain flour


Instructions
Heat the oven to 180ÂșC and butter the ramekins.

Melt the chocolate and butter in a bowl over simmering water.

Beat the eggs with the sugar until they are very fluffy and light and then fold in the flour, followed by the chocolate and butter mixture.

Divide between ramekins (you can put some in the fridge at this stage if you want to eat them later).

Bake in the over for 8-10 minutes. They should rise slightly and have firm outsides whilst still being nice and gooey in the middle.

Dust with icing sugar and serve hot.

I would recommend vanilla ice cream and honeycomb as a great accompaniment.

- - - - - - - - - - - - - - - - - - - - - - - - - - - - - - - - - - - - - - -

Enjoy!!!

souffle pot

Next time we will be cooking decorative shortcrust pastry pies. Just in time for British Pie Week.

Thursday, 29 November 2012

let's cook: chutney

chutney


We started the year so well, but our monthly cook-off challenge has slipped a bit off track.

I think the fact that it was summer and both of us wanted to spend our time outdoors, rather than in the kitchen, was the main contributing factor. I'm not sure cooking will ever become a passion of mine.

However, we have decided to pick it up again for the winter months, and our chosen challenge for November is some nice festive chutney.

My mum jumped in early and laid claim over this recipe (the one I used last year) and I'm trying out a new one:

- - - - - - - - - - - - - - - - - - - - - - - - - - - - - - - - - - - - - - -

Spiced courgette chutney

Ingredients

2 chopped onions
500g chopped tomatoes
500g diced courgettes
300ml white wine vinegar
2 Granny Smith apples (peeled and diced)
250g muscovado sugar
2 tsp mixed spice
1 tbsp mustard seeds
small piece root ginger
4 crushed garlic cloves

Instructions

Add all the ingredients to a large pan (I always underestimate the size of the pan and end up needing two) and bring to a simmer. Stir occasionally so the mixture does not stick.

Simmer for about two hours until the mixture has thickened and looks darker in colour.

Put into sterilised jars and leave for at least 3-4 weeks until eating.

- - - - - - - - - - - - - - - - - - - - - - - - - - - - - - - - - - - - - - -

I think my mum has a bit of an advantage at the moment as she's using a tried and tested (definitely tasty) recipe. But all will be revealed over the Christmas Day cheeseboard. At least we'll have a panel of voters to decide the results this time.

Sunday, 26 February 2012

soft yolk scotch eggs

warm scotch eggs

For this month's cook-off challenge I picked scotch eggs. I remember making a scotch egg once before, in year 7 at school, but I'm pretty sure there would have been no hot oil involved that time.

My mum opted out of the deep-fat frying and found a recipe for oven baked scotch eggs, but I thought I'd go for the challenge and based mine on the following recipe from Hugh. (I bought a fire blanket in preparation though for fear that I could have burnt my flat down!)

5 large eggs
500g organic pork sausage meat
A few sage leaves, finely chopped
A good pinch of ground mace
A pinch of cayenne pepper
Salt and freshly ground pepper
Groundnut oil, for frying
3 tbsp plain flour
100g day-old white breadcrumbs


Make sure the eggs are at room temperature. Bring a large pan of water to the boil, lower in four eggs and simmer for seven minutes. Transfer the pan to the sink and run the cold tap into the pan to stop the cooking. When the eggs are cool enough to handle, peel them.
Add to the sausage meat the sage, mace and cayenne, along with plenty of salt and pepper, and mix well with your hands. Divide into eight equal pieces and shape each piece into a flat patty.
Take two patties and use to encase one egg, moulding the meat smoothly around the egg and making sure it's sealed all over. Repeat with the others.
Pour groundnut oil into a deep-fat fryer or deep, heavy-based pan to a depth of at least 7cm and bring up to 170C (or until a cube of white bread, when dropped in, turns light golden brown in about one minute). Spread the flour on a plate. Beat the remaining egg in a shallow dish. Spread the breadcrumbs on another plate. When the oil is up to temperature, dust each sausagemeat-encased egg in a little flour, then dip it in beaten egg and roll it in breadcrumbs. Lower into the hot oil and fry for eight to 10 minutes, turning from time to time, until deep golden brown all over. Drain on kitchen paper and serve hot, for once. Or cold, later. 

I bought a bit less sausage meat than recommended so used medium eggs instead of large, and if I was making them again I would use less/no sage, but that's just personal preference.

For the breadcrumbs I used a mixture of some white bread and some of the sourdough bread I had left over from my bread-making class.

breadcrumbs

I thought I'd try sprucing up a couple of the eggs so I added some caramelised red onion relish between the egg and the sausage meat. Good for the taste buds, but not so good for the construction as it meant that the sausage meat was harder to seal around the egg.

process

The cooking process went very smoothly though (no oil fires), and they didn't take very long at all.  I decided to eat one egg hot from the pan and was pleasantly surprised to find the egg yolk was still warm and runny - a result I thought it would be tricky to achieve!

scotch eggs

Unfortunately, a warm soft yolk also leads to a cold soft yolk though, which didn't go down so well when I cut an egg up for my parents to taste test yesterday. Oh dear.

If you are after hard-boiled scotch eggs to eat cold later I would add a few minutes of initial boiling time to Hugh's recipe.

I'd say the results were, on the whole, mostly successful though. My dad gave me a 6/10 score (with points deducted for the runny yolk and too much sage). He only gave my mum 1/10 this month. Judging by this photo I'm not surprised though:

Oh dear mother!
It turns out oven-baked scotch eggs are not the way to go!
Next month, Battenberg cake!